Residential Solar Installation Timeline: What to Expect at Every Stage
Your Solar Journey Made Effortless
Transitioning to solar may seem akin to stepping into a realm filled with wires, panels, and a maze of documentation. While the prospect of solar energy may seem exciting, we understand that as a residential customer, you would care to know what the exact milestones are and when.
This is the process that takes the mystery, and consequently, the anxiety out of the process.
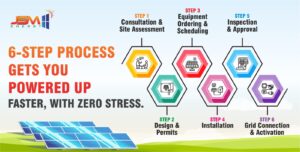
Currently, we are serving customers with a single detached home, townhouses and even flats with a shared rooftop. They are all guided through a 6 step process solar installation journey. Think of it as a solar roadmap: Your very first conversation to the moment your solar powered system is effortlessly generating energy in real time, powering your home.

Step 1 – Consultation & Site Assessment
Every great solar story begins with a conversation. The first step towards your residential solar is where you and the installer come to a mutual agreement.
Looking to implement cost savings and reduce your electricity bill? Hoping to position yourself as a greener consumer? Seeking to gain greater energy autonomy? The response to these queries shapes the system’s type and size to be installed, which is why many homeowners explore residential solar installations early in the journey.
In the case of houses, it involves checking the condition of the roof and its slope, as well as if it gets adequate sun exposure throughout the day. In the case of flats and apartments, the exam may concentrate on the shared rooftops, balconies, or any community solar arrangement.
The most efficient panels do not work in deep shade. Your site assessment will include checking nearby trees, tall buildings, and even seasonal shadow patterns. For this, a detailed site survey and consultancy helps identify the best placement.
Step 2 – Design & Permits
Your site has passed the assessment, It’s time to create a tailored plan. The plan will look at your electricity consumption, the available area, and your future outlook. In flats, and when space is limited, the system will be more creative in arrangement.
The solar array’s performance is also about property’s looks. An effective system is a well-designed system that integrates aesthetics and performance, often backed by expert solar PV design and engineering support.
Before installing any systems, permits from local authorities or the building management are needed because they validate safety compliance. Permits are there for your own safety, unlike the misconceptions of being classified as red tape.
Step 3 – Equipment Ordering and Scheduling
With the design finalized and permits received, the next phase is acquiring the required system parts. Panels, inverters, and mounting systems constitute the most critical components of your solar setup. Installers usually rely on trusted EPC solar services to source high-quality equipment.
For some, the waiting period while the required components for a solar system are being manufactured can be a few days to a few weeks. Coordinating installation with your schedule also ensures minimal disruption.
Step 4 – Installation Day
Typically less chaotic than expected, installation day is often filled with surprises. As always, the crew members will arrive on site. All tools will be carried, safety precautions arranged, and the work begins. For most homes, the process takes 1–3 days.
You will see harnesses, scaffolds, and other protective paraphernalia. These all ensure professionals stay within the safety measures and appropriately protect your property, a part of dependable solar operation services.
Detached houses often finish faster. Shared rooftop flats sometimes take longer because of inter-unit coordination, which can stretch for an additional day or two.
Step 5 – Inspection & Approval
Final inspections are a prerequisite for “going live” with the system. These are usually conducted by the local building authority and sometimes by a representative from the utility company. Inspectors check whether the system secured and labeled the wires, monitoring safety, the fuse box, as well as the overarching safety regulations.
Additionally, other minor adjustments such as labeling and tightening connections are often requested. These are typically addressed the same day.
Step 6 – Grid Connection & Activation
This is when the long-awaited moment has arrived: your system is now capable of generating clean energy. The utility company will put in place an advanced meter that registers both the electricity consumed and the electricity sent back to the grid.
Net metering is an optional incentive in some locations which allows users to receive compensation for the surplus energy produced. Opting for professional net metering services ensures smooth setup.
Your home now draws energy from the sun: with a flip of a switch, the system is activated. It is a moment of excitement and for some, the silence is striking – the panels produce no sound.
Get Started Eliminating your Electric Bill Today
If you own your own property or reside in a flat, start exploring your solar potential today to see what options are available to harness solar energy. You can schedule a consultation with a solar energy professional to start your site assessment. You will see how quickly you are able to power your home with clean energy.
Given its efforts for millions of years, the sun will surely be able to help you power your home.
FAQs
- Expected duration of the entire 6 step process?
With an initial assessment meeting, solar energy activation for home systems will take anywhere between 6 to 10 weeks, depending on permits and equipment availability.
- Can solar panels be installed on flats and apartments?
Yes, but the systems may need to be in the form of smaller arrays, mutual systems, or community solar projects.
- Is my presence needed for the entire installation?
While your presence will be needed at the start and end of the installation, you need not be home for the entire duration.
- What is the leading cause of project delays?
Schedules for equipment delivery and permits are the leading causes of project delays.
- Will the benefits be immediate?
You will start to see activation benefits and savings starting from your first billed month.


Leave a Comment